
Video is a powerful tool for engaging website visitors. It can be used to communicate…
An Inner View on Interviews: Lighting the Talent
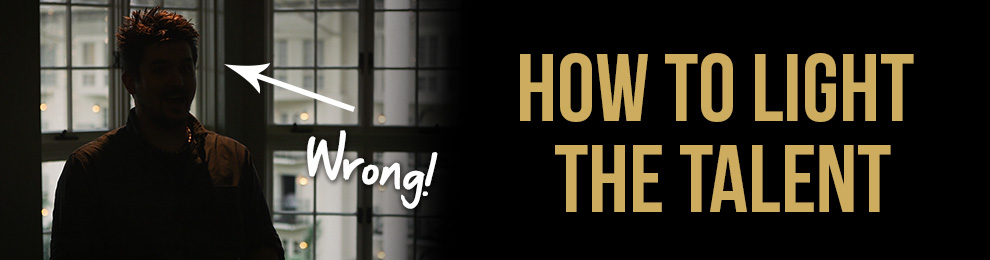
Welcome back to another exciting look at interview set ups and beyond. Last time I wrote on the importance of testing a scene to see a scene you’ve set up will look, before wasting your talent’s time adjusting on the fly. There are always a vast number of things to be looking for when you test these scenes, but one in particular is how the lighting effects your subject. Without a doubt this is one of the most noticeable elements of an interview to both you and the audience. I can be very quick to notice when it’s wrong, but it can also be one of the longest issues to actually fix.
So what goes into a proper lighting setup? Believe it or not almost every shoot, especially interviews, utilize similar if not the same basic setup. This is known as Three-Point Lighting. It’s so essential and effective that it is taught to most first year film school students. But just what goes into this sort of lighting plan? Well as you may have guessed, there are three elements. For those of you who’ve already read my previous installment, there was an image explaining it.
For those of you who already know what TPL is, I recommend that you keep reading. I’ll be giving tips and tricks I’ve found over the years of using it to making it work better with less work.
So first, what are the three points? Well, listing them in Lemmy’s Really Super-Awesome Order of Importance, there is the Key Light, the Fill Light, and the Backlight. The three of these all combine to light your subject. But even though it can seem redundant to have this many light sources on a single person, I can assure you that each one fulfills a very specific role to make someone look as good as they can. Consider that there is only one person on the screen for the viewer to see, and therefore there is nothing else to look at. As such you want them to look as good as possible. So just what does each light do?
Key Light
The Key Light is the most head on and direct source of light for your subject. Alone it should appear to be the brightest single source of light hitting the talent. Apart from being the brightest source of light, it also provides modeling light for the speaker. This means that it was light one side dramatically, and leave the other a little darker, which provides them with a more dynamic look. It is a more visually appealing look for the human face than that of flat lighting. We are used to seeing facial features with shadows in certain places. The Key light should be placed offset slightly to body position of the speaker. For example, if you were sitting in the talent’s position, the Key Llight should be around either the 10 o’clock or 2 o’clock position from the direction your chest is pointing. This allows you to directly control where these shadows will fall. It should be the light you focus on the most when you work on your adjustments.
“https://wemakevideos.wpengine.com/wp-content/uploads/2017/06/key-light.jpg” custom_margin=”100px|||” alt=”Key Light Example” title_text=”Key Light Example”
“https://wemakevideos.wpengine.com/wp-content/uploads/2017/06/fill-light.jpg” alt=”Fill Light” title_text=”Fill Light”
Fill Light
Next comes the fill light. As it’s name suggests, this light is about filling in some of the direct shadows you create with the Key Light. Because of this roll, it is important that it is placed on the opposite side of the talent from the keylight. If your Key is hitting their left side, you want the fill to be placed on the right. The goal is to fill in the shadows, while also providing ambient lighting for the body. Even though the face is the most important space of the interview, you don’t want to neglect the other areas of their body, or they’ll begin to look as if they are lighted, which you want to avoid. This light should also be noticeably dimmer on the histogram (a graph which depicts light levels as the camera sees them) than that of the Key light. It’s only there to help control those shadows. We have a term here called the “Channel 5” look. It refers to how people on news programs typically look, as there is little time to do a proper lighting setup. They usually look far to bright, and even occasionally blown out. This same effect can happen if you have the fill light to hot. Remember, adjust the shadows, don’t undo them.
Back Light
Last but not least is the Backlight. Also referred to as a hair light, this is by far the most under appreciated and therefore overlooked of the lights. It’s only function is to provide a defined edge where the talent ends and the background begins. It is set up behind the talent, and usually favors the side opposite of the Key. However, if there is a prop or element in the scene that would explain it (such as a lamp or window) it is ok to favor the side that would effect the talent. This edge lighting can be especially useful at telling the audience’s eyes where the focal point is changing, as the talent’s hair should be in focus, and if able, the background should be out of focus. This removes information inside the frame and keeps attention drawn to the object of (quite literally) focus. It provides that element which allows the person to “pop” off the background.
“https://wemakevideos.wpengine.com/wp-content/uploads/2017/06/back-light.jpg” alt=”Back Light Example” title_text=”Back Light Example”
Together the three lights work to light the individual in a way that provides depth, contrast, and dynamics. If done correctly, your talent will appear as the brightest section of the video, which naturally draws the eyes attention. Keep in mind that the position of the lights will always be a little different depending on the space you’re working in. A three-point setup inside a dark office will play by very different rules than say on an exterior set. The physical constraints, the natural lighting, and a slew of other variables all contribute to what your light will need to accomplish, and from where.
“https://wemakevideos.wpengine.com/wp-content/uploads/2017/06/all-lights.jpg” alt=”all lights on” title_text=”3 point lighting”
We’ve only just scratched the surface of lighting, and next time we’ll look at some of the other important factors of lighting you’ll want to know before moving on. For now, take time to look over some tutorials on how to properly create the three point setup and focus how it affects the talent. Next time we’ll take a look at how those lights also effect a background, along with some tips and tricks for properly exposing and lighting the background.
Until next time!
“https://vimeo.com/223356877”
3 Point Lighting Video Example with Each Light Separated
Related Posts