Everyone has heard the old saying “Lights! Camera! Action!” It’s practically synonymous for the filmmaking industry, and something many of our clients jokingly say as we’re just about to start rolling. And if you stop for a moment and break it down, you’ll notice that lights are mentioned before the camera. There is a reason for this. For anyone who has spent time studying filmmaking or videography at the collegiate level, you’ll know that proper lighting is one of the hardest single elements to learn and master when making a video. They’re the key to unlocking a set’s potential, setting the mood of a scene instantly, and if masterfully implemented it can be part of the storytelling process. However, good lighting takes time.
I bring all of this up to explain why my series of understanding the process of setting up an interview has yet to move away from the realm of lights. I simply can’t stress how important it is to give you the right illumination on illumination up front. Consider it a very necessary en-light-enment. Alright, puns aside, let’s move on to the next step of the process. This week, we’re looking at two other very important elements to look for when you’re lighting a scene.
The first of these is to understand what light spill is, and how to control, or even harness it. In simple terms, light spill is undesired light, which typically comes from your production lights. If you think about you, your lights are pointed in a direction, but that doesn’t stop light from extending out from the sides. This “spilling” effect can cause issues, two of which are of note. The first is when it hits the lens of your camera, which causes glare, or worse a white vignetting on the footage itself. This is usually an easy fix, as you can simply move the camera. But if that isn’t possible, you can block the light. As we like to work quickly, we invested in a quick glare guard for our cameras. Not only does it work for lights, but it’s been an invaluable investment when we do exterior shots… since it can block out that most pesky of uncontrollable light sources, also known as the very first light, also known as the sun. I strongly recommend picking one of these up if you’re looking into doing videography more than occasionally.
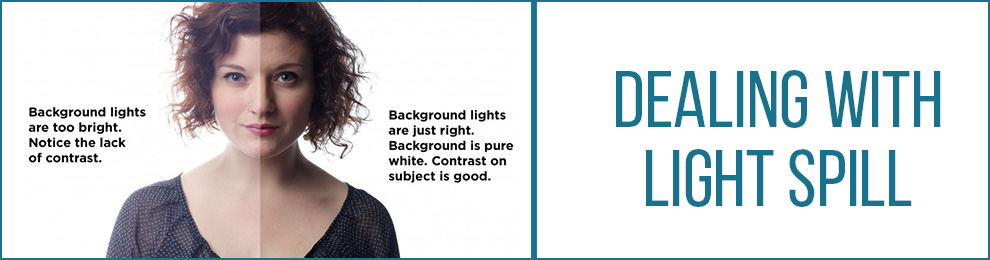
The second more complicated issue light spill can present is when it affects your background. Whether it’s a reflection of one of your lights, or unwanted light hitting your otherwise very dramatic background, it’s something you want to consider. If the space allows, you can raise the lights and aim them down. This reduces the light being thrown horizontally and therefore reduces how much it effects the background. Additionally, you can move the setup (preferably early in the process) further from that background, where the Key and Fill lights are far enough away from the background to cause much difference. You can however harness this spill and use it all as a sort of fill for an otherwise dark background. The point to remember is that when you’re setting up your lights for the subject, don’t forget those lights may also be hitting your background.
Here is a short video of another video production company dealing with a common issue of light spill during a video production.
Now moving on to the second issue to consider, I preface this by saying that it could be an article in and of itself. However, even though I respect the lighting process, we have a lot of other topics to cover for Interview set ups beyond it. So let’s talk about exposing for the scene. This is a term that I honestly had not truly committed to heart until I began working here.
It is complicated, but the term refers to the idea of setting the camera exposure for the background levels before you even turn on a single light. This is especially useful when you are shooting outside, or next to a window, as exteriors are typically far brighter than the interior you’re shooting in. Not doing this usually results in the outside being a white, blown out mess.
By setting your exposure utilizing your ND filters, ISO, and F stops, you’re making the sky or other bright light source in the background correctly exposed. You can then light your foreground (or in this case your subject) following all the normal rules we’ve learned so far, but with the baseline exposure that the background needs to look good. Keep in mind that your lights will almost always be much brighter than they would be if you didn’t need to expose for a bright background. I know this may seem complicated without seeing it (or you may know all about this… it’s all a matter of how much you know coming into this series). But for the sake of caution, I’ll give the rationale behind this skill.
Imagine you plan to shoot an interview against a lovely window showing a nice sunny courtyard behind the speaker. The concept is great, but if you don’t expose the camera to that background and only think about how the speaker looks, you’ll typically end up with a decent looking speaker, but a completely blown out background. So instead, before turning on any lights you intend to use, expose the camera so that the outside looks good, even if the foreground is too dark to see anything. Once it looks good, then start lighting your scene and testing it (as we discussed, that’s important). That way, when you’re done both your subject and the bright background will look good.
So there you have it, two handy pieces of information to remember when it comes to light and your scene. While not always applicable, these tips and tricks will not only help you to utilize light to it’s maximum potential, but be prepared for common lighting challenges you may encounter on set. Although we have only scratched the proverbial surface of lighting know-how, next week we’ll take a look at the next important part of the setup process: the talent position. It’s our last stop before getting to some camera tips and tricks for interviews.
Until next time!
